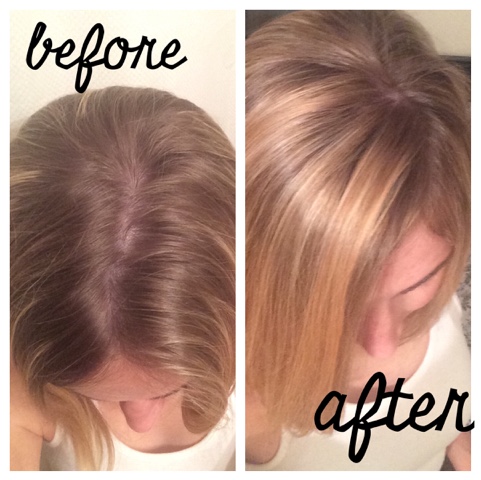
I have been paying for salon highlighting for so long that I can't really remember when I started. Over the years, my hair has been pulled through a cap, foiled and on several misguided occasions, been dyed darker. Now, I can add balyage to the list. And I did it myself, and it was so affordable and easy!
I watched and read several tutorials on balyage, a technique where the hair color is painted on strands of hair. Balyage seems so much less scary than pulling hair through a cap (does anybody even do that anymore?) or trying to use foils at home. The best tutorial, hands down, was a video from Jessie James Decker about the process she uses to balyage her (gorgeous) hair at home. I bought the same brand and color kit that she uses and decided my free Friday night would be devoted to this endeavor. That way if things went horribly south, I had two full days before work for an emergency repair job on my hair.
No, need for concern! This was so easy. Here is what I bought:
The color of this kit is Honey, and it only cost $7.49. It would have cost less at Wal-Mart, but my store was out of this color and I had to buy from the grocery story, which is more expensive (but hey, way less expensive than a two-color process).
The process couldn't have been easier. Mix the bleach powder with the cream activator and, if you're following instructions in the kit, use the tools and gloves provided to apply the dye. I used my bare hands and a toothbrush for application. This was so easy and I was admittedly slow and overly cautious so as to not drop dye on dry strands and cause spotting. Typically, I part my hair on the side, so for more natural results, I parted my hair down the middle. Taking small strands, I painted the color on my hair starting in the middle and using my hands to really work the color in and push it to the end of my hair and close to the root (don't get the color on your scalp - it can look spotty or streaky).
My roots were pretty grown out, so I knew my color was going to need to process for longer than what was recommended in the video that I watched. Recommended process times in the instructions are from 10 - 60 minutes. My color was on for about 30 minutes and I could have absolutely kept it on for a few more minutes to get the perfect color, but given this was my first time doing this - so thrilled with the result!
What will I do differently next time? I will do this during the day with natural light on my side. My apartment doesn't have amazing lighting at night, but perfect lighting during the day. This forced me to do some guesswork on the timing of the process. Fortunately, erring on the side of caution worked well, and I'm so pleased with my results!


No comments:
Post a Comment